
Many people are positively mystified at why anyone would ever want to learn how to straighten eyelashes. After all, why would you iron out those naturally glorious curls that the rest of us are trying so hard to get?
It sounds crazy…until you remember that time you accidentally curled your lashes too much.
Remember the discomfort? The pain of having crookedly curled lashes poke you in your eyes and eyelid skin? Yeah, that’s what living with naturally, extremely curled – and often crooked – lashes feels like.

At first, super curly eyelashes may sound like a blessing but it comes with all sorts of drawbacks. For starters, unruly curls are prone to get tangled and when it comes to brushing out eyelash curls – well, it’s not the easiest task.
And have you ever tried applying a few coats of mascara on crooked, rogue lashes? It’s a thankless task that only emphasizes the disarray.
Even worse is the poking. If you’ve got lashes that curl in all different directions, there are bound to be those few jerk lashes that poke you where it hurts the most: your eyeball and your eyelid skin.
Yup, that’s when you start getting serious about finding a great eyelash straightener. ‘Cause although most of your friends won’t be able to sympathize with your “high quality problem,” you’ve still got lashes poking you in your tender spots. And who’s got time for that kind of irritation? Not you.
So let’s get to it, here’s how to straighten eyelashes in record time!
Use a Heated Eyelash Curler
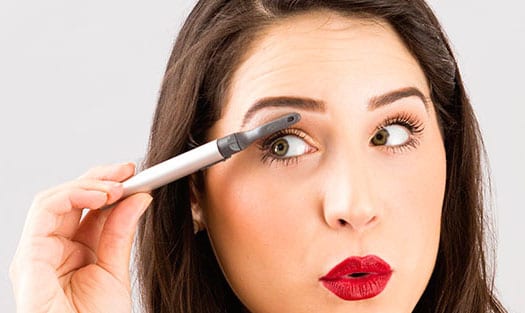
If you’ve got crooked, extremely curly and unruly lashes – the only eyelash straightener that will truly straighten your lashes and give them the style you want is a heated eyelash curler.
A regular clamp-style lash curler is pretty much useless for already super curly lashes and will only accentuate the direction of the rogue lashes. By the way, don’t try to use a regular lash curler upside down to straighten your lashes – you won’t get great looking curls that way and will only wind up with a bizarre crimp in your lashes.

Instead, save yourself a lot of trouble and go for a heated lash curler. The heat works to gently loosen the tight curls and coax your lashes into the direction you want to them to go. It even works to tame even the most stubbornly wild lashes.
The downside, of course, is that straightening your lashes with a heated curler will take a little bit of time since it’s essentially doing double duty: ironing out the curl and lifting your lashes into a natural, sweeping curve.
The good news it that it still doesn’t take that long – around a minute or two for each eye. Start by combing your lashes with the heated curler from the top side of your lashes, brushing down with the curler. This will help straighten the tight curls.
If that’s all you want – you’re finished there. If you’ve like to add an extra lift and curve to your lashes, go ahead and brush the bottom of your lashes to get that wide-eyed, awake look.
Use A Primer
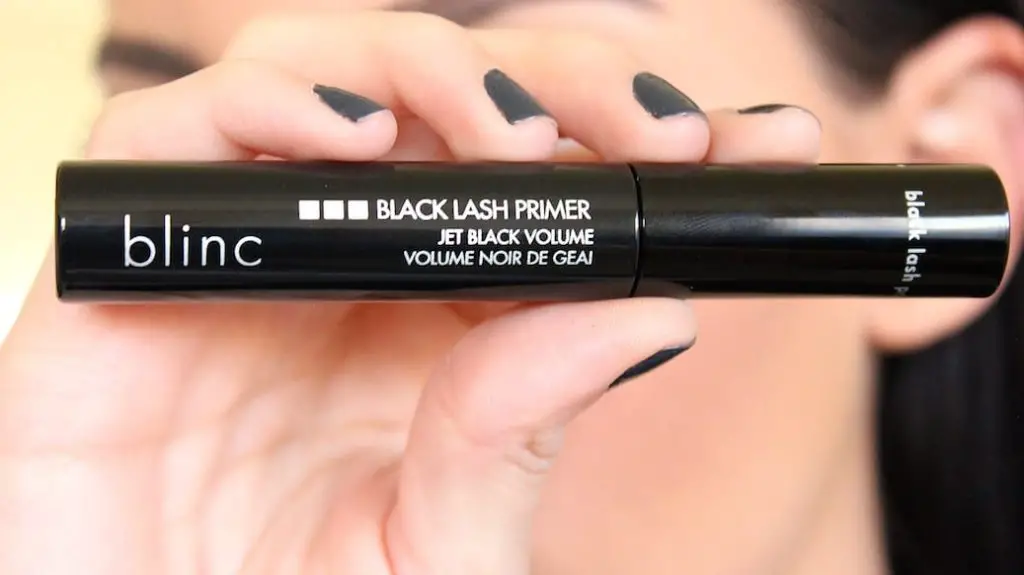
Your lashes are essentially just hair and as with all hair – a good priming product helps it to hold the style your want.
There are a ton of great lash primers on the market – both Clinique’s Lash Building Primer and the more affordable, two-in-one Loreal Double Extend Primer & Mascara are great for adding length and volume – but we recommend that you opt for a lash primer that also doubles as a conditioner.
The best pick is Blinc’s Lash Primer, which is free of irritating ingredients like dye and fragrances while containing anti-inflammatory and healing ingredients to moisturize, nourish and strengthen the lashes.
And this protection is absolute key to counteract the effects of heat, which is hands down the best way to straighten your lashes…
Add mascara, if you want
This last step is totally optional but adding mascara on top can help weigh down your lashes and further help ‘set’ the style.
And of course, you can always do an extra round with the heated curler after applying mascara – just make sure to wait until it’s dried first!