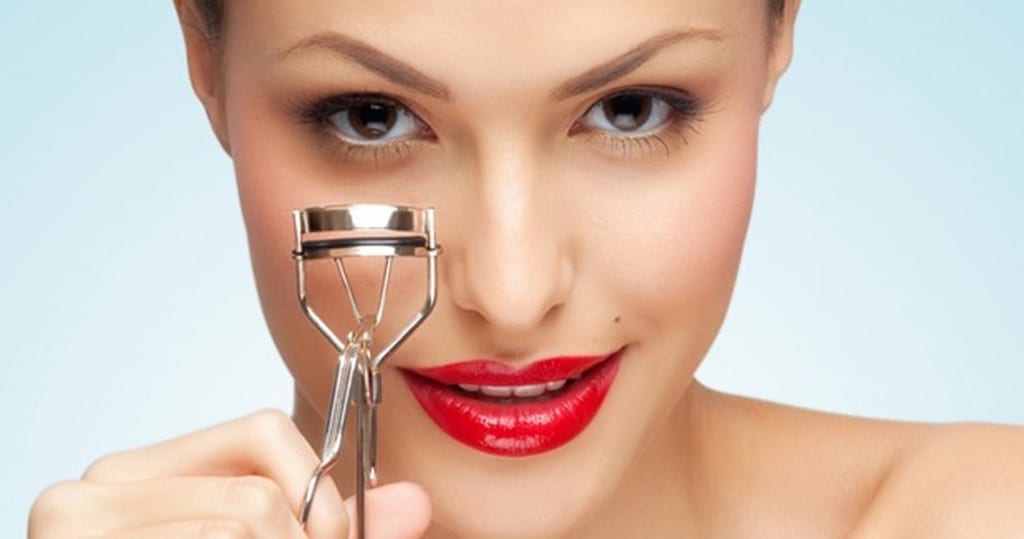
The very first thing you need to know about heated eyelash curlers is how to curl your eyelashes using one of these. Duh, you say.
But it’s not as obvious as it sounds. Heated lash curlers are very different from traditional, clamp-style curlers and ‘though they come with instructions, figuring out how to use one to its maximum potential is more of an art than a science.
This is why heated eyelash curlers tend to be so controversial.
Some people absolutely love them and will guard theirs with their life. But some people hate them and think they’re a total waste of time and money.
So what’s the difference? The first group actually knows how to use one.
If you just got a heated eyelash curler – or are thinking of getting one and wondering what it entails – read through for some tips and tricks on getting yours to do exactly what you want it to do.
It’s a quick read and it’ll save you a lot of frustration.
Ready to become an artistic expert with these heated curlers? Read on…
Choose the Right Curler:
A lot of people simply get a recommendation for the best heated eyelash curler and make their decision based on that. But it’s not quite that simple.
In order to choose the best heated eyelash curler for you – you need to know what you want it to do.
For example, are you looking for a natural, smooth uplift of your lashes? Then, you’ll want to choose a wand-style heated lash curler.
On the other hand, if you’re looking for a more intense ‘C’ curl, a clamp-style heated lash curler will suit you better.
Another thing to consider is how you’re going to use it. Are you going for the falsies look?
That means you’re looking for a heated lash curler that’ll give your lashes an extra bend after you’ve layered on the mascara.
Wand-style curlers are ideal for this whereas, in our experience, the clamp-style heated curler works better before mascara.
The Product Helps to ‘Set’ the Curl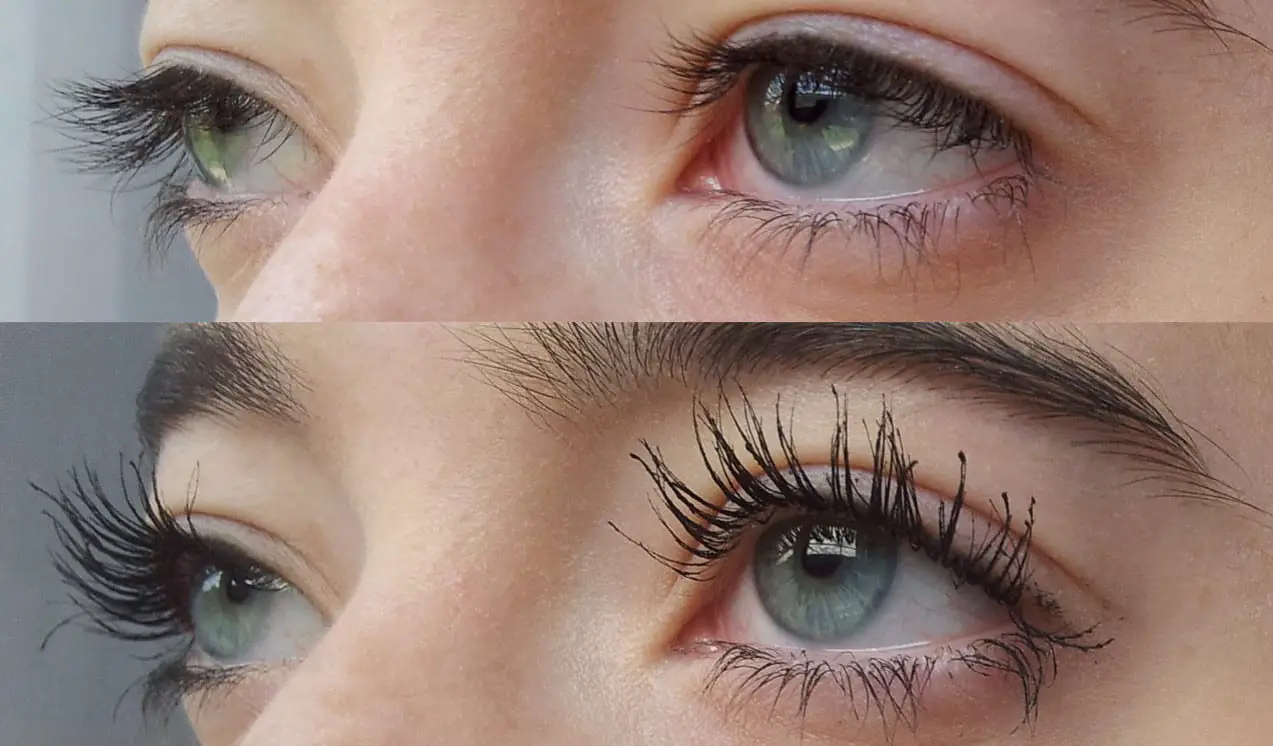

Want beautifully curled lashes that lift upwards flawlessly and stay put all day?
A primer or a curling mascara definitely helps to get more curve and staying power.
The heat warms the mascara, allowing your lashes to bend a little more and then it sets as it dries.
You can use the heated curler before applying anything but giving your lashes an extra lift after the mascara makes a bigger difference, especially if you’re using a wand-style heated curler.
Most of these also have well-spaced grooves on the head that double-duty as a lash comb so you can also use it to separate and define your lashes between every layer of mascara.
Just make sure you wait until your mascara is completely dry before you use the heated curler – you don’t want a clumpy mess on your hands. Not fun.
Synergy Applies to Lash Curlers, too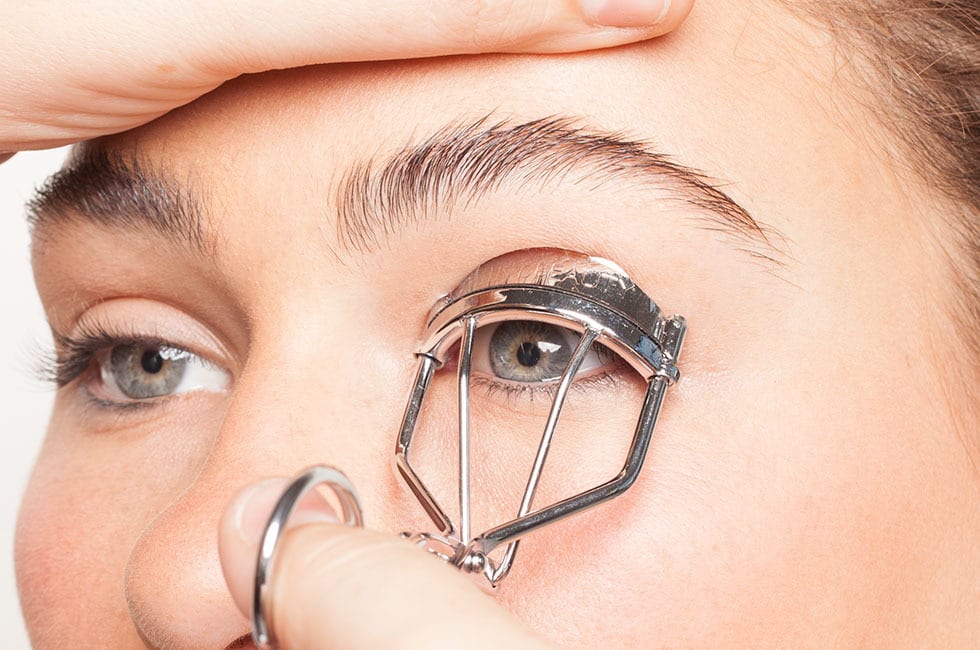

You’ll get plenty of curly goodness with a heated lash curler alone but if you’re looking for truly va-va-voom lengths and curve – use it along with a traditional lash curler for extreme, sky-high lashes.
It goes like this: Start by curling your lashes with a traditional clamp curler to get the curl started.
Apply a layer – or two – of mascara. Wait for it to dry and then use the heated lash curler to lift and curl your lashes to dramatic heights.
Even when you’re not trying to create intense lashes, the two types of curlers work very well together.
For example, traditional clamp curlers tend to make sharp, 90-degree angles in lashes – that dreaded L-crimp – that’s annoying and difficult to iron out of your lashes once set.
This is where heat curlers come in handy – a heat lash curler will gently take the ‘fold’ out and smoothly sweep the lashes up and around ’til it all looks completely natural.
Start at the Roots: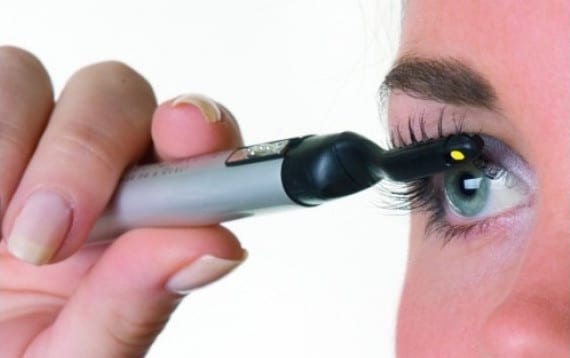

Heated lash curlers can be intimidating – after all, who feels totally comfortable at the idea of putting something hot near their eyes? No one.
So when you first start using one, you might be too wary to use the curler at the base of your roots. But once you’ve gotten used to it and realized that these curlers aren’t actually scary at all and that you won’t burn yourself – it’s time to go for the best results.
And that means starting the curling at the base of your lashes. This creates the best eye-opening, wide-awake curl.
If you’re using a clamp-style heated curler, start crimping at the base of your lashes and then slowly ease the curler toward the ends.
One swoop – from the base to upwards – takes be around 10 to 15 seconds, gently holding in certain areas to set the curl.
If you’re using a wand-style curler, start at the base of your lashes and slowly brush upwards, making sure to tilt the lashes into the position you want them to go.
This slow brushing from the roots to the tips takes around 10 to 15 seconds and again, you want to spend that time ‘holding’ the curl in the positions you want.
Go Slow and Repeat:
Many heated lash curlers come with instructions that say something like, “Curl upwards, keeping the comb pressed against lashes for five seconds.”
And that’s about right…but five seconds just doesn’t cut it.
Remember that it’s the combination of heat and holding the position that creates the style of curl you like – take the time to bend the lashes back and push back to create the curl you want. Move slowly and experiment with the angles at which you hold it.
An easy trick is to start with the lash curler at the base of your lashes and then do a slow blink – the pressure of the blink helps curl your lashes as they move through the curler.
How to Create Different Curls:
Most clamp-style heated curlers generally make it easier to get a more curved curl. For example, Hitachi’s EyeCrie is way better at creating intense curls than a more natural, sweeping lift.
But what if you want gradually uplifting, natural curls? Here’s how to get it with a clamp-style heated curler:
Start crimping at the base of your lashes and then gently ease the curler toward the middle of the lashes.
Stop before you reach the ends of your lashes so you don’t create extreme curl at the ends.
By contrast, if you prefer more extreme, ‘C’ curls, sweep and shortly hold the heated curler at the end of your lashes.
Wand-style heated curlers tend to create an uplift rather than a curl, but if you want – you can also create ‘C’ curls using these types of heated curlers ‘though it’ll take a big of practice. Here’s how to do it:
As you curl your lashes, use the wand to bend the lashes toward your eye until you get about halfway up your lashes – this creates a ‘C’ curve – and hold it there for a couple seconds.
Repeat ’til you get the ‘C’ shape you want.
More Tips on Curling Your Eyelashes:
Below you can check out more of the tips on curling your eyelashes effectively, professionally and perfectly.
Do follow these tips if you have this ultimate wish to get longer, thicker and fuller eyelashes at your end:
Tip 1:
It is a must for you to prep this lash curler of yours. In addition, you have to always grab a high and top quality lash curler.
Look for the lash curler that is of universal shape and should be able to work well with any kind of eye shape.
Furthermore, your curler needs to be easy to hold and it should have an ergonomic handle.
You can have the curler for your lashes that comes with gentle and also latex free rubber pads.
Once you have shopped the right lash curler, then you can warm it up a little bit and use it accordingly.
Tip 2:
You have to carefully position and adjust your lash curler. Only then, you can bring that fuller and lengthening effect on to your eye lashes.
Your eyes have to be halfway open. Besides, it is advised to position your lash curler all and completely around your lash zone part.
In other words, you have to place it at your lashes base part. Just make sure to get as much closer to base as you can and avoid the curler to grab your skin.
Tip 3:
Right after you are done with the positioning part of your lash curler, you need to pulse that curler for a few of the times.
Just clamp down your curler for about five to ten seconds and infuse light pulses on it.
Tip 4:
If you want to get super bright and super thick looking lashes, then it is recommended to tilt your lash curler a little bit and keep it in an upward position and also reach it to your forehead slightly.
By doing so, your eyelashes will be able to get intense looking curls.
Tip 5:
While you use a lash curler, your main aim is to extend your lash curls more and more. This is only how you can end up getting natural looking lashes.
And you can finalize and lock this whole look of yours with an application of top-notch mascara.
Upon applying mascara, you can easily and conveniently lock your lash curls for hours and hours.
There is no need to apply falsies now as this is a great way of getting full length lashes in less time.
Conclusion!
So, get hold of a good quality heated eyelash curler and curl your lashes in the most desirable manner.
You can share with us what tips you follow routinely and regularly to make your lash line fuller, thicker and super lush.
We have only mentioned the use of a heated curler and more ways are coming sooner that tells you simply on how to grow your lashes.
Keep in touch with us and keep connected over here.
It’s going to take a bit of practice but it’s oh, so worth it!